How can we help?
Result Page
Unter dem Menüpunkt Result Page lässt sich die Ergebnisseite konfigurieren.
Result Page
The Result Page is the page that is displayed to the customer at the end of the question tree. It contains Product recommendations, descriptions and benefits, call-to-action buttons und vieles mehr. Die Result Page kann individuell gestaltet und angeordnet werden. Es können u.a. der Titel, die Überschrift, die Anzahl der Produkt-Spalten auf der Ergebnisseite, etc. festgelegt werden.
On the Result Page you can sort the products into groups. There are also 3 sections in which you can influence the structure of the product recommendation:
- Top Sections
- Product Sections
- Bottom sections
Durch Klicken auf „Result Page“ im Digitizer gelangen Sie auf folgende Seite:

- Result Page Title: Titel der Ergebnisseite
- Result Page Headline: Überschrift der Ergebnisseite
- Result Page Bottom Line: Unterschrift der Ergebnisseite
- Wrong Filter Text: Dieser Text erscheint, wenn der User in einem Sekundärfilter auf der Ergebnisseite einen Wert einträgt, der nicht zulässig ist.
- Show amount of Recommendations shown: Anzahl der angezeigten Empfehlungen zeigen
- Enable editing of user inputs on result page: Möglichkeit zum Bearbeiten der ausgewählten Optionen direkt auf der Ergebnisseite
- Recommendations can only appear in one sort group: Verhindert, dass ein Produkt, welches zwei sort groups angehört, in mehr als einer auf der Ergebnisseite angezeigt wird. Dies ist beispielsweise dann relevant, wenn Sie Premiumprodukte nur in der obersten sort group anzeigen lassen möchten und nicht zusätzlich in einer weiteren sort group darunter.
- Recommendation Amount: Möglichkeit dem User auf der Ergebnisseite anzuzeigen, wie viele Produkte ihm empfohlen werden und wie viele weitere Produkte mit seinen Angaben im Fragebogen übereinstimmen würden. Nachdem Sie das Kästchen links abgehakt haben, lässt sich das Feld für die weiteren Einstellungen öffnen
- Template: Hier tragen Sie nun den Text ein, der auf der Ergebnisseite zu sehen sein soll und ergänzen die Platzhalter {{shown}} und/oder {{total}} Der Platzhalter {{shown}} bezieht sich auf die Anzahl der Empfehlungen, die aktuell auf der Ergebnisseite angezeigt werden und der Platzhalter {{total}} darauf, wie viele Empfehlungen insgesamt mit den Eingaben im Fragebogen übereinstimmen.

sort groups
Mit der Sort Group kann man die empfohlenen Produkte zusätzlich anhand in der CSV-Datei hinterlegten Wertung sortieren und dadurch in Kategorien einteilen.

- + Add Sort Group: Neue Sort Group anlegen
- Mit dem Pfeil können Sie die Sort Group einklappen und somit mehr Übersicht über die vorhandenen Sort Groups gewinnen.
- Sort group label: Name der Gruppe auf der Ergebnisseite
- Meta name: Der Meta Name ist ein technischer Name und wird automatisch angelegt
- Product attribute: Die Spalte aus der eingepflegten CSV-Datei, nach dessen Information / Zahlenwerten sortiert werden soll.
- Sort function (ASC oder DSC): Aufsteigende oder absteigende Reihenfolge, in der die Produkte empfohlen werden. Die Reihenfolge basiert dabei auf den in der CSV Datei festgelegten Werten. Diese hinterlegen Sie in einzelnen Spalten: Wenn 1 oder 0 als Werte eingegeben werden, können Sie steuern, ob die Produkte angezeigt werden sollen (1) oder nicht (0). Wenn Sie nachfolgende Zahlen (z.B. 1-5) festlegen, können Sie die Reihenfolge beeinflussen.
- Maximum shown: Maximale Anzahl der Produkte der Sort Group, die beim Laden der Ergebnisseite aufgeklappt angezeigt werden sollen. Bei maximum shown wird also festgelegt, wie viele der bei maximum loaded angegebenen Produkte in voller Größe angezeigt werden sollen.
- Maximum loaded: Maximale Anzahl der Produkte, die insgesamt geladen werden. Beispiel: Wenn „maximum shown“ bei 5 und „maximum loaded“ bei 10 liegen, werden zunächst 5 Produkte in voller Größe angezeigt. Anschließend können durch einen Klick 5 weitere Produkte in voller Größe angezeigt werden, sodass insgesamt 10 Produkte geladen wurden.
- Threshold: ab diesem Wert werden all die Produkte angezeigt, die in der Produktdatei (CSV) einen mindestens genauso großen Wert hinterlegt haben
- Delete: Per Klick auf den Mülleimer wird die Sort Group gelöscht.
Result Page Top/Bottom Sections
Die Top und Bottom Sections unterscheiden sich nicht in ihrer Konfiguration oder Funktionalität. Der entscheidende Unterschied ist die Lage im Frontend: Die Top Sections befinden sich über den Produktempfehlungen und die Bottom Sections darunter. Top/Bottom Sections können folgende Elemente beinhalten, die sich über den Button „Add Section“ hinzufügen lassen:
- CTA api Button: Erzeugt einen Button, welcher als Schnittstelle zum Übermittel der Ergebnisse an einen Warenkorb dient. Dieses Feature ist aktuell noch technisch etwas komplexer. Bei Fragen können Sie sich gerne folgendermaßen bei uns melden: kontakt@foxbase.de
- CTA Form Page Button: Erzeugt einen Button, welcher den Kunden auf die Kontaktformular-Seite weiterleitet.
- CTA Button Label: Hier legen Sie den Text des Buttons fest
- Target Form Page: Hier wählen Sie die entsprechende Kontaktformular-Seite aus
- CTA PDF Download Button: Erzeugt einen Button, welcher dem Kunden die Möglichkeit gibt, ein hinterlegtes PDF herunterzuladen.
- Button Label: Hier legen Sie den Text des Buttons fest
- Template URL: Hier hinterlegen Sie das von Ihnen ausgewählte Dokument für den Kunden
- Custom Download File Name: Hier legen Sie fest, wie das Dokument betitelt seien soll. Fügen Sie jeweils die Endung „.pdf“ hinzu.
- Display: Hier können Sie festlegen, dass der Download Button nur nach bestimmten Antworten im Questionnaire angezeigt wird
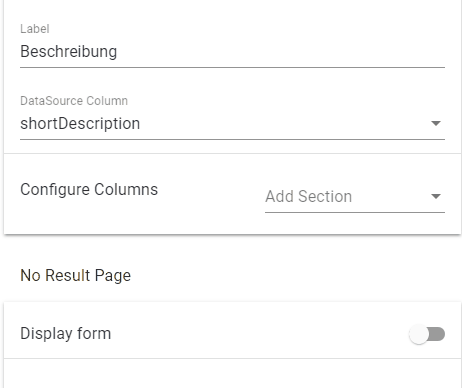
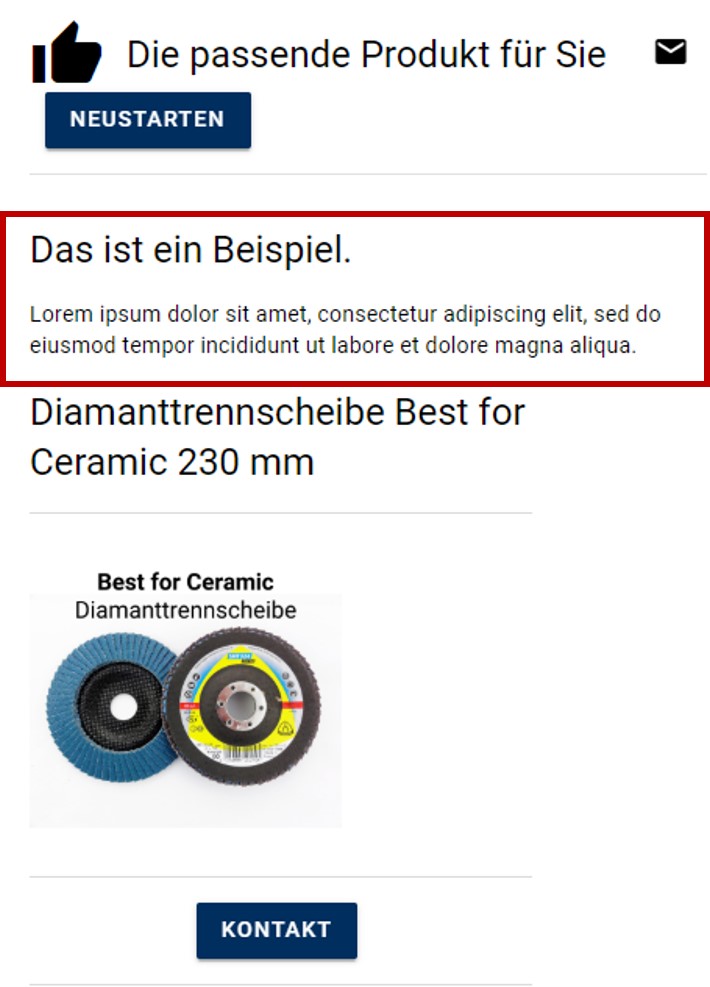
- Headline: Eine Überschrift unmittelbar über der Product Section
- Paragraph: Ein Text zwischen der Headline und der Product Section
- IFrame: Hier können Sie weitere Elemente wie z.B. ein Video einbinden
- Display / Do Not Display If: Hier können Sie festlegen, dass ihr eingebundenes Element nur nach bestimmten Antworten im Questionnaire angezeigt wird
- Share Button: Gibt dem Kunden die Möglichkeit Ihre Website/Produkte o.ä. anderen per Email zu empfehlen
- Button Label: Hier legen Sie den Text des Buttons fest
- Sharing Email Subject: Hier legen Sie den Betreff der zu teilenden Email fest
- Sharing Email Body: Hier legen Sie den Inhalt der zu teilenden Email fest
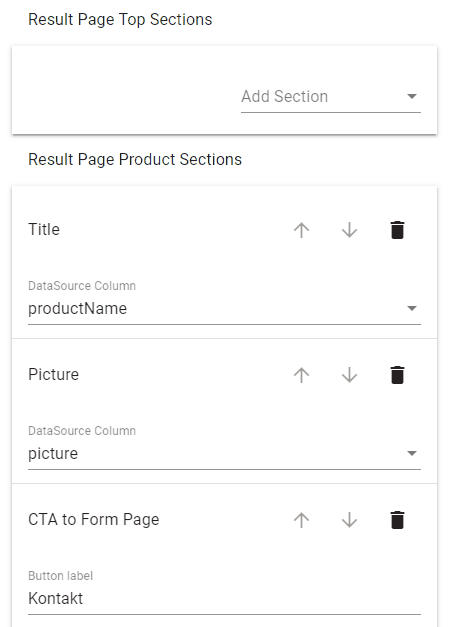
Result Page Product Sections
- Title: Titel des empfohlenen Produktes
- Data Source Column: Hier legen Sie die zugehörige Spalte ihrer CSV Datei fest
- Display: Ermöglicht die Aussteuerung der Anzeige des Titels in Abhängigkeit von den Antworten des Nutzers im Questionnaire
- Additional Data: Gibt dem Kunden zusätzliche Informationen über ihre Produkte
- Icon URL: Hier können Sie ein Icon hinterlegen
- Static Label: Über diesen Reiter legen Sie die Überschrift des Abschnitts fest
- Label From Data: Hier können Sie alternativ zum „Static Label“ die Überschrift aus der CSV Datei ziehen
- Data Source Column: Hier wählen Sie die Spalte der CSV Datei aus, in welcher die Informationen hinterlegt sind
- Display: Ermöglicht die Aussteuerung der Anzeige des Elements in Abhängigkeit von den Antworten des Nutzers im Questionnaire
- Additional Data Expandable: Hat dieselbe Funktionsweise wie „Additional Data“, jedoch sind die Informationen zunächst verborgen und können mit einem Klick vom Kunden ausgeklappt werden.
- Picture: Ein Foto des empfohlenen Produktes
- Image URL Template: Hier hinterlegen Sie die URL des von Ihnen gewählten Produktfotos. Durch Eingabe einer URL wird bei allen Produkten dasselbe Foto angezeigt. Um variable Fotos zu verwenden, muss für jedes Produkt eine individuelle Bild-URL in der Produktdatei hinterlegt sein. Über den Reiter „DataSource Column“ können Sie auf die enstprechende Spalte der CSV-Datei zugreifen.
- Price: Dieses Feature dient zur Berechnung des Gesamtpreises der ausgewählten Produkte, ist zurzeit jedoch nicht verfügbar
- CTA to Form Page: Erzeugt einen Button, welcher den Kunden auf die Kontaktformular-Seite weiterleitet
- Button Label: Hier legen Sie den Text des Buttons fest
- Target Form Page: Hier legen Sie fest, auf welches Kontaktformular der Kunde weitergeleitet werden soll
- User-Input: Dieses Feature ist zurzeit nicht verfügbar
- Download: Hier können Sie dem Kunden bis zu 8 Anhänge wie z.B. Anleitungen, technische Datenblätter o.ä. zum Download anbieten. Eine detaillierte Erklärung finden Sie auf dieser Seiter weiter unten unter Download section.
- CTA to external Link: Leitet den Kunden zu einer anderen Website weiter (diese wird in einem neuen Tab geöffnet)
- Button Label: Hier legen Sie den Text des Buttons fest
- External Link: Hier hinterlegen Sie die Webadresse, an welche der Kunde weitergeleitet werden soll
- Data Source Column: Falls Sie eine andere Webadresse je nach empfohlenem Produkt hinterlegen wollen, können Sie diese in der CSV-Datei hinterlegen und diese Spalte hier auswählen
- Labels: Auf der Ergebnis-Seite können zu jedem Produkt vier Labels / Icons hinzugefügt werden. Diese werden in der CSV-Datei in einer entsprechenden Spalte mit ihren URLs hinterlegt. Die Konfiguration ist identisch zu der in der Download Sektion (8) und wird weiter unten in diesem Artikel genauer beschrieben.
- Copy Text Modal: Bietet dem Kunden die Möglichkeit, einen von Ihnen ausgewählten Text mit einem simplen Klick in seine Zwischenablage zu kopieren
- Static Label: Here you define the title of the section
- Label From Data: Here you can get a variable title from your CSV file
- First Copy Button Label: Here you can specify the text of the first "Copy" button
- First Attribute For Text: Here you can store the text to be copied using the CSV file

- Download modal: Has the same functionality as Download (8), but differs in appearance in the frontend
- CTA api Button: Generates a button that serves as an interface for submitting the results to a shopping cart. This feature is currently technically a bit more complex. If you have any questions, please feel free to contact us as follows: kontakt@foxbase.de.
- Handlebar data: Allows you to access the answers from the questionnaire and use them in different ways on the results page
- Icon URL: Here you store the URL of the icon of your choice
- Static Label: Here you define the title of the tradable section
- Label From Data: Here you can get a variable title from your CSV file
- Data Source Column: Here you select the associated column of your CSV file (in this you determine which inputs from the questionnaire you want to use. It looks something like this:
<{{userInput[0].questions[0].answers[0].value}}>
Example: link backend (left) & frontend (right)

Setting up product sections
As shown above, different sections can be set up on the results page, such as a download section or label section.
Download section
Any number of download sections with a maximum of eight attachments can be added to each product on the results page. For example, instructions, technical data sheets, etc. can be attached in the download area.
To go to the download section, choose from the menu: Result Page > Result Page Product Sections > Add Section > Download.
Before that, when uploading the product in the CSV file (see also product upload), the corresponding columns (in this example: technical_sheet_url and technical_sheet_name) must be set, which contain the URLs to the attached files in the download area:

Info: Column names in the CSV file
These can then be downloaded accordingly under "First URL Column" etc. can be selected. Further attachments can be added by clicking on the plus symbol (see below).
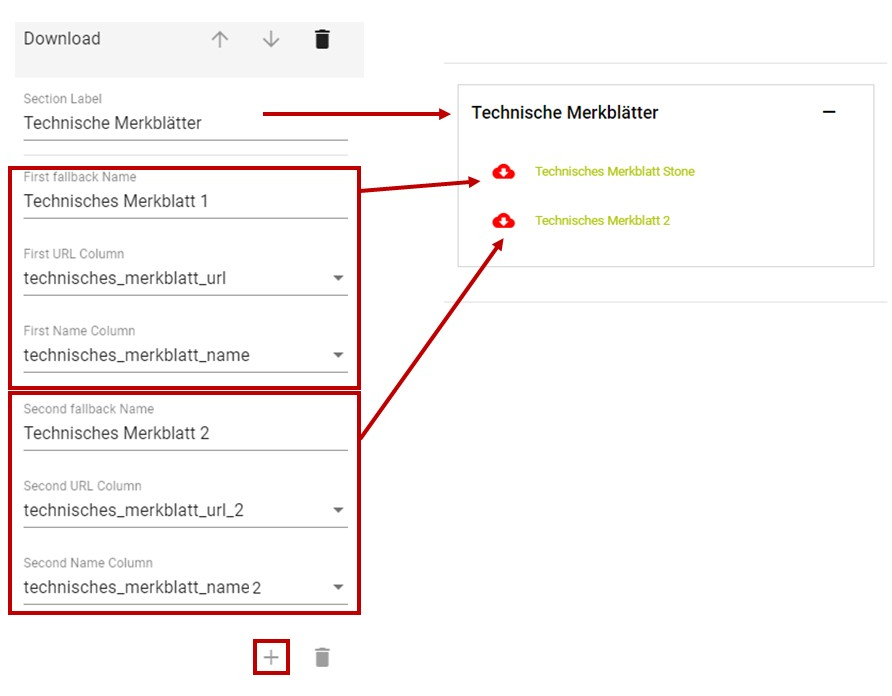
Info: left: configuration of the download section in the digitizer backend; Right: Download section in the selector (frontend) that the user sees
Via "First URL Column" the column containing the URL to the attached file must be selected.
Via "First Name Column" the column containing the name of the respective attached files can be selected.
This means that individual attachments with individual designations can be set for each product, eg "Merkblatt A-600" or "Merkblatt B-600".
DANGER: If nothing is specified under "First Name Column", the name set under "First fallback Name" is used.
In addition, product data sheets can be generated in the download section. Templates for this can be found here:
Download template result PDF for customers: DOWNLOAD HERE
Template product data sheet PDF for customers: DOWNLOAD HERE
Save the template as follows:
- open link
- Right click "Save As"
- save in .fodt format
- Open and edit file with LibreOffice
You can read how the configuration of the PDF data sheets works here: Digitizer documentation > Leads > Create PDF for the Digital Product Selector
label section
Four labels / icons can be added to each product on the results page. The label section can be selected under "Configure Columns".
Here, too, the corresponding columns containing the URLs for the labels must be set in the CSV file before the product is uploaded. The configuration is identical to the download section (see above).

Example: Headline + Paragraph
In addition to the product sections, additional Result Page sections can be created above and below the result sections. Under "Result Page Top Sections" or "Result Page Bottom Sections" the desired sections such as a headline, a CTA button or a text section can be created.
shopping cart
In the Result Page section under "CTA api Button" the Interface for submitting the results to a shopping cart be determined. This feature is currently technically a bit more complex. If you have any questions, please feel free to contact us as follows:


